BigSur Hackintosh
This is my personal Hackintosh repo. The main branch is now for BigSur only and will likely not work in near future. If you still want to use Catalina go to its branch.

BigSur works OOB. No new kexts were used (Wifi on this chip still works and works well)
OpenCore
Version: 0.6.5
OpenCanopy bootscreen is enabled and I am using the modern iconset
What works
- Native Power Management ✅
- Wifi/Bluetooth ✅
- File Vault ✅
- Hardware Acceleration (iGpu in headless mode) ✅
- Apple Services ✅
- Audio over HDMI ✅
- Audio over DP (requires restart after hotplug) ✅
Hardware
| Part | Info/Link |
|---|---|
| MoBo | Gigabyte H110m ds2 DDR3 |
| CPU | i5 6500 skylake |
| iGPU | Intel HD Graphics 530 |
| dGPU | Sapphire Radeon RX 460 4GB bios modded to RX 560 4GB. Make sure your card is on the confirmed working if you feel like not risking it (this one is) |
| RAM | Kingston 8GB |
| Wifi/BT Card | Fenvi HB1200 PCI WiFi natively supported wifi card based on the BCM94360CS2 chipset |
| Storage for MAC | 250gb Crucial Balistix SSD + Seagate 1TB HDD |
| Storage for Mindows | 250gb Samsung 950 EVO + Seagate Barracuda 1TB HDD |
| Case | Fortron CMT240 |

Kernel Extensions
My setup does not require many kexts. I built all from source using Lilu-and-Friends. Masive thanks to @corpnewt, you are the boss!
SMC: VirtualSMC
Sound: AppleALC
Graphics: Lilu and WhateverGreen
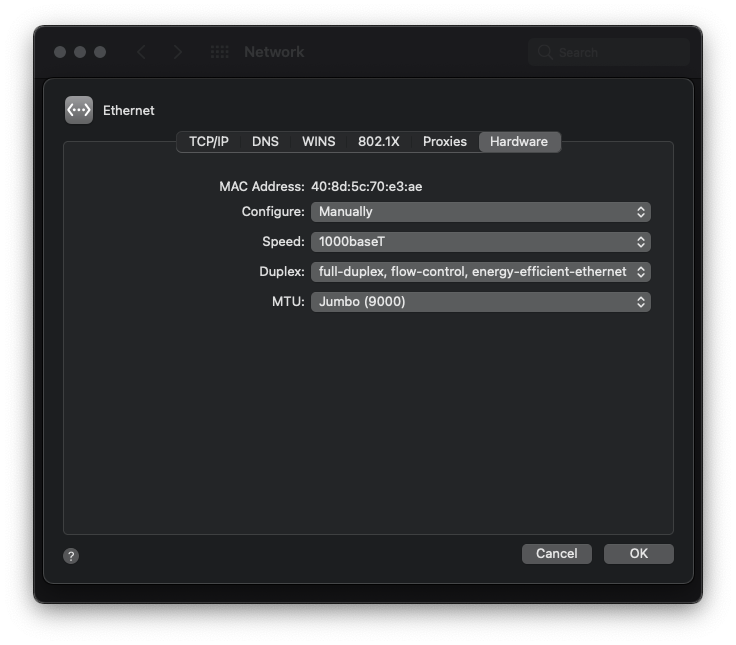
LAN: RealtekRTL8111 -> Switched to the new advanced driver from Mieze. Couple of new features and the planned features look frankly amazing!
ACPI
So the SSDTs I am using are not “needed” per se but they help my machine run as natively as possible the explanation to what they are is as follows:
SSDT-EC
This is the dummy EC for macos to attach to. Mine is very simple because the PNP0C09 device on this board already has _STA method, which means that as long OC and MacOS is concerned, it has no EC it would conflict with – which is awesome! (This little board surprised me on so many levels)
SSDT-USBX
Another basic one. This enables charging trough USB on Skylake or newer boards (usually combined to one with SSDT-EC but I like them separate)
SSDT-PLUG
This enables MacOS to attach to the first CPU core to properly powermanage your CPU.
SSDT-SBUS-MCHC
This one is interesting as this extends the SMBUS funcionality on your hack. SMBUS is very importaint for many reasons which the Dortania guide to ACPI explains much better than I ever could.
SSDT-HPET
This is one part of the IRQ patches that were part of Clover. With OC it is harder than just clicking a box but SSDTtime by, once again CorpNewt, can do it for you. There is second part to it and that is the ACPI patches for OC – SSDTtime generates them for you too. In my case those are patches 0 – 2 in the ACPI -> Patch section of the config.
USB
Strictly speaking, these comonents do not need USB mapping. You do not get over the arbitrary limit imposed by MacOS. But there are some advantages, like marking the port bluetooth hub is connected to as internal and making sure your usb 3 runs on the maximum speed.
I used Hackintool to generate custom injector kext. This just seemed to work much better for me.
- Identifying ports – I have done tho work for you on this board

- Setting up Hackintool accordingly
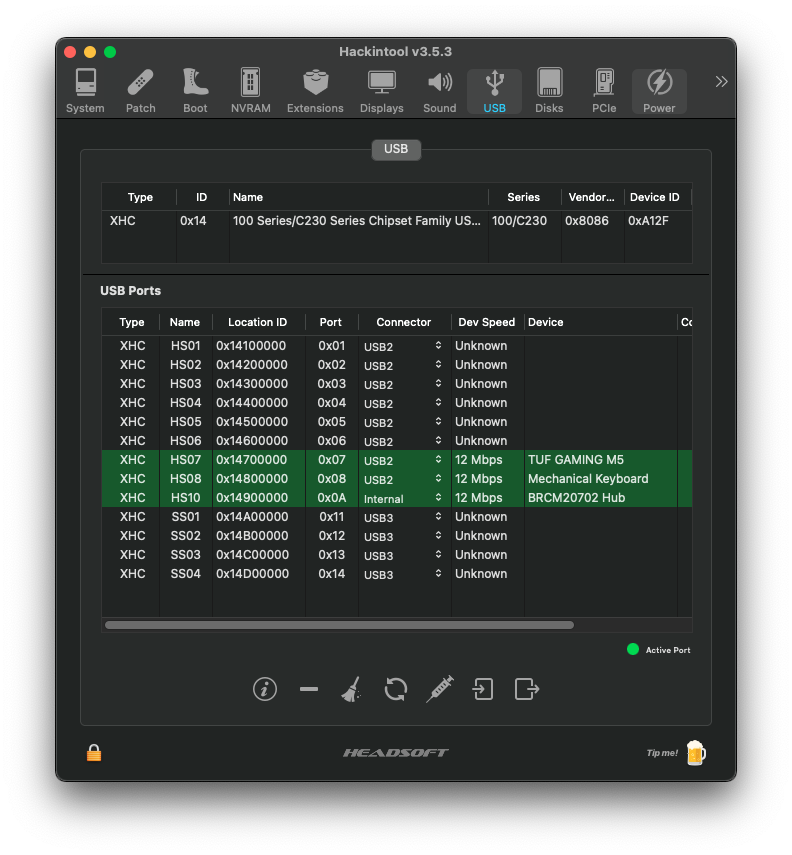
- Export and use the USBPorts.kext
OS switching through bootcamp
So one of the coolest features to OpenCore in my opinion is the ability to switch OS using native methods such as Bootcamp.
- Boot to windows and download CorpNewt’s brigadier
- Run the tool. It will download Bootcamp with version native to your SMBIOS – SOME OF THEM USE OLDER VERSION WITHOUT APPFS SUPPORT! In that case do not reboot straight after instalation.
- Install Bootcamp by double clicking Setup found in the downloaded folder (in the script’s location directory).
- Run the Apple Update software and let bootcamp update. It appears in the start menu.
- Restart back to MacOS. You will see BOOTCAMP as option in Startup Disk settings. If it is not there, check that the disk is mounted by MacOS.

I however found problem for people that use second HDD on their Windows. Since Bootcamp was never meant to be run with multiple drives, the setup just sets attributes of every other disk to Hidden. Instructuions on how to fix it can be found here
Native Power Management
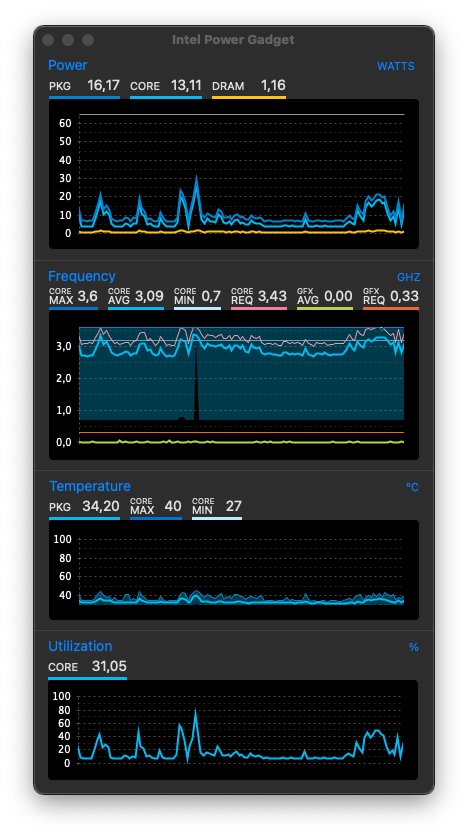
CFG-Lock
This board does not have the abilitty to disable cfg-lock from bios – meaning it has to be done manually by finding the offset and applying it through the modified grub shell. The process can be found here.
SMBIOS
Closest comparable iMac is iMac 17.1. So that is the SMBIOS we choose. For the platform info we use GenSMBIOS. For more info follow iDiot’s guide to iMessage
External monitor brightness and volume control
You can use Monitor control to acheve this. It is very easy to setup
$ brew install --cask monitorcontrol